Welcome to our in-depth guide on Fruity Slicer, a versatile plugin within FL Studio that enables users to chop and manipulate audio samples effortlessly. Whether you’re a seasoned producer or a beginner exploring the world of music production, Fruity Slicer offers boundless opportunities for creativity and innovation. In this detailed tutorial, we’ll walk you through each step of using Fruity Slicer, providing clear instructions and valuable tips to help you maximize its potential.
Step 1: Add a Sample to Fruity Slicer
The journey begins by adding your desired audio sample to Fruity Slicer. Open the plugin within FL Studio and locate the “Add” button. With a simple click, browse your computer to select the audio file you wish to manipulate. Once imported, your sample will be displayed within the Fruity Slicer interface, ready for further exploration and editing.
Step 2: Set Up Slicing Parameters
Now that your sample is loaded into Fruity Slicer, it’s time to fine-tune the slicing parameters to achieve the desired level of precision.
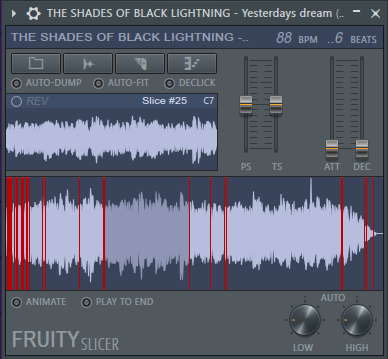
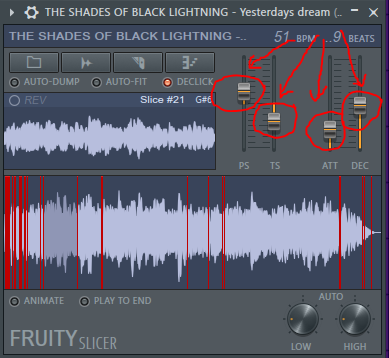
- Slicing Knob: Use the “Slicing” knob to determine the number of slices the plugin will create. Increasing the value will result in more slices, allowing for intricate and precise editing.
- Piano Button for Beat Divisions: Next to the “Slicing” knob, you’ll find the “Piano” button—a powerful tool for dividing your audio sample into specific beat divisions. Click on the keys to select your desired beat divisions for slicing. Each key represents a specific beat value, such as 1 beat, 2 beats, 4 beats, and so on. This feature helps you align your slices perfectly with your project’s tempo.
- Pitch, Fit Length, Attack, and Decay Knobs: Experiment with these knobs to modify the sound of each individual slice.
- Pitch: Adjust the pitch of the slices to create interesting melodies or harmonies.
- Fit Length: Shorten or extend the length of the slices to control their duration in your arrangement.
- Attack: Set the attack time to control how quickly the sound reaches its peak when each slice is triggered.
- Decay: Adjust the decay time to control how long the sound takes to fade out after the slice is triggered.
- REV Function: Take your sliced samples to the next level with the “REV” function. This reverses the slices, adding a touch of unpredictability and grooviness to your music. Play around with this function to explore new creative possibilities.
Finally, don’t be afraid to experiment and try different combinations of settings to find the perfect slice arrangement for your project. Each adjustment opens up a world of unique soundscapes and possibilities.
Step 3: Trigger Slices
With your audio sample sliced to perfection, it’s time to explore various methods for triggering the individual slices. If you prefer hands-on control, consider using a MIDI controller to assign each slice to a specific MIDI note. FL Studio’s intuitive “MIDI Learn” function simplifies this process, allowing you to assign MIDI notes to slices effortlessly.
Alternatively, if you prefer a more visual approach, leverage FL Studio’s piano roll to trigger slices directly. Simply drag and drop each slice onto the piano roll and use MIDI notes to trigger them. The piano roll offers a visual representation of your sliced audio, making it easy to sequence and arrange your slices according to your creative vision.

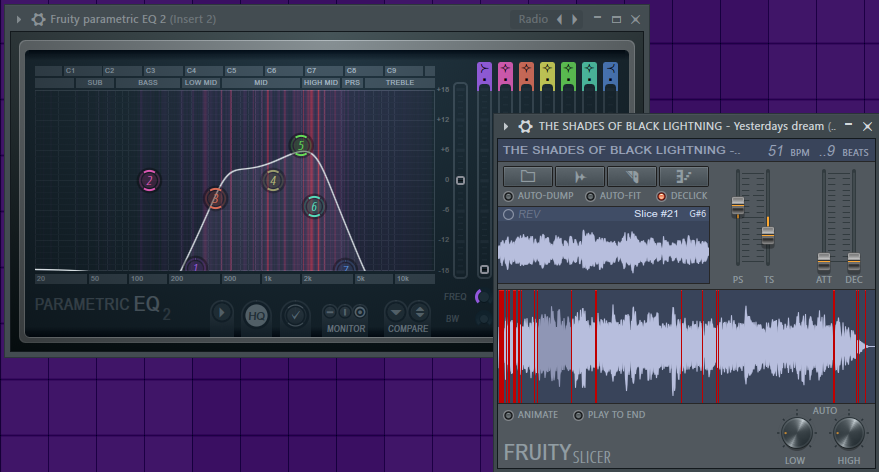
Step 4: Apply Effects
Now that you’ve mastered the art of slicing and triggering, it’s time to add depth and character to your sliced audio with effects. FL Studio boasts a vast array of built-in effects, ranging from EQ and reverb to delay and distortion. Experiment with different effects chains to sculpt your soundscapes and create unique sonic textures.
Don’t hesitate to explore third-party plugins as well, as they can offer additional creative possibilities beyond FL Studio’s native effects. Whether you’re looking to add warmth and saturation or experimental modulation effects, the right combination of effects can elevate your sliced audio to new heights of creativity and expression.
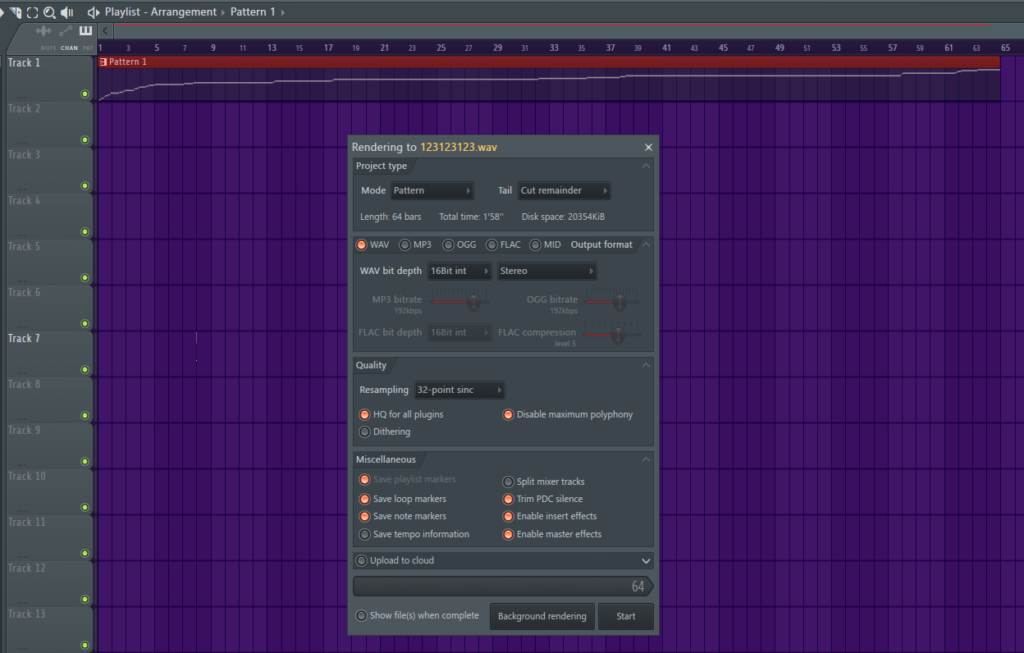
Step 5: Export Sliced Audio
Congratulations! You’ve successfully sliced, triggered, and enhanced your audio to perfection. Now, it’s time to share your creations with the world. FL Studio makes it easy to export your sliced audio in a variety of formats, ensuring compatibility with your preferred digital audio workstation (DAW) and other music production tools.
Navigate to the “File” menu within FL Studio and select the “Export” option. Choose your desired file format, specify any additional settings, and click “Export” to save your sliced audio to your computer. Once exported, you can seamlessly integrate your sliced audio into your DAW projects, remixes, and compositions, ready to inspire and captivate your audience.
You can get more information about exporting files in FL Studio on: “Producer, you must know how to export FL Studio project with these simple ways”
Conclusion
In conclusion, Fruity Slicer is a powerful and versatile tool that empowers producers to unlock new dimensions of creativity and expression in their music production endeavors. By mastering the techniques outlined in this guide, you can harness the full potential of Fruity Slicer and take your productions to the next level. Whether you’re crafting beats, remixing tracks, or exploring new sonic landscapes, Fruity Slicer offers endless possibilities for innovation and discovery. Embrace the journey, experiment boldly, and let your creativity soar with Fruity Slicer by your side.


2 Responses
I thank for very valuable information. It very much was useful to me.
I’m glad you like it! If you have any more questions, feel free to ask.